The short answer would be, “Create a control adapter, add it to your .browser file and have it applied using browser recognition”. If you want the longer verion, you will have to continue reading.
First, let us start with some basics on control adapters. I find them extremely useful tweeking built-in EPiServer (the CMS that I most often find myself working with) controls; especially adding things to how they are rendered in the CMS’s edit mode.
What is a control adapter?
In essence, a control adapter is a straight forward way of changing the output of a control before it is being rendered and sent to the browser. If one of these is attached to a control, it will automatically be called whenever the control needs rendering.
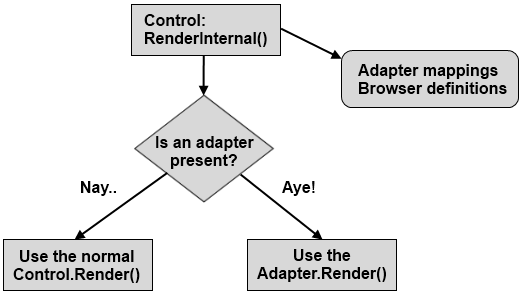
Adding a file called for instance AdapterMappings.browser to your website’s App_Browser directory will allow you to store site specific adapter mappings. A line of setup in here will have the control rendered using your own specifications. Should you rather have your browser definitions specified globally, the place to do it is under the %SystemRoot%\Microsoft.NET\Framework\v4.0.30319\Config\Browsers\ directory. Here you may also find inspiration and examples on how to write your definition files; see for instance firefox.browser, ie.browser or blackberry.browser
Adding a control adapter to your solution
The XML setup for adding a control adapter to in a browser file is not at all complicated. It is just a matter of pointing to a control type (5) as well as an adapter type (6). Below is a simple browser file adding a control adapter to the a-pain-to-style ASP.NET FileUpload control that will be used as default for all browsers. The configuration below is taken from a previous post, describing how to style <input type=”file” /> elements. It may be a good place to look if you are just after a quick example on how to write an adapter.
AdapterMapping.browser
<browsers>
  <browser refID="Default">
    <controlAdapters>
      <adapter
         controlType="System.Web.UI.WebControls.FileUpload"
         adapterType="EPiServer.CodeS/.. ../UploadAdapter" />
    </controlAdapters>
  </browser>
</browsers>
The next step is to write the adapter class itself. The least you have to do is inherit from the ControlAdapter base class, but depending on the control you are aiming to better, you would probably end up using one of its derivatives instead; such as the WebControlAdapter for instance.
MyControlAdapter.cs
public class MyControlAdapter : ControlAdapter
{
You will get a long way inheriting the ControlAdapter base class. Aside from supplying you with the usual event handlers, you will also be able to override other useful things, such as for instance the SaveAdapterControlState and SaveAdapterViewState methods. These are very helpful should your adapter need to maintain its own state information.
protected override object SaveAdapterViewState()
{
    return new[]
               {
                  base.SaveAdapterViewState(),
                  _dataToMaintainInViewState
               };
}

protected override void LoadAdapterViewState(object state)
{
    var stateArray = (object[])state;
    base.LoadAdapterViewState(stateArray[0]);
    _dataToMaintainInViewState = stateArray[1] as string;
}
As you may not want the original state to be lost while using your adapter, you might want to fill your state handling methods with something like in the snippets above. Instead of just returning the base view state object in the save method, chunk it together with your own inside an object array (11-15). Same thing when loading the state back up again; your object state parameter (18) will be an object array, and needs to be handled as such. Push the original state object up the ladder (21), and do as you wish with your own information (22). In the SaveState lifecycle stage, the SaveAdapterViewState method is called immediately before the Control.SaveViewState method. Same goes for the LoadAdapterViewState method, but immediately before the Control.LoadViewState in the LoadState. If you are interested, you can read about when to use the ControlState instead of the ViewState at the Remarks section of this page.
Modifying the control being rendered
You have obviously created an adapter since you are not happy with something, perhaps the default way things are presented to the visitor. The ControlAdapter base class allows you to change this by supplying you with methods such as BeginRender, EndRender and Render. All of them gets a HtmlTextWriter object as in-parameter, which you may use to display anything that you want. How this is done is covered in more detail in the render methods described in the previously mentioned post. In short, you would want to do something like this in your Render method.
protected override void Render(HtmlTextWriter writer)
{
   var dropDownList = Control as DropDownList;
   if (dropDownList == null)
      // Do something

   // ..

   foreach (var item in dropDownList.Items)
   {
      // Render something
The ControlAdapter base class will also give you access to important tools while constructing your markup; the Page and, as you saw above, Control objects contain just what you think they do, the page itself and the control that is currently being adapted. You will also get an HttpBrowserCapabilities object called Browser which will give you invaluable information on the capabilities of the visitor’s browser.
Browser and device specific markup rendering
So, how would you go about using different adapters for different browsers or devices then? Well, it is all a matter of editing your browser definition files. For instance, my %SystemRoot%\Microsoft.NET\Framework\v4.0.30319\Config\Browsers\ directory contains a file called ie.browser with an identification node (3-6) pointing to Internet Explorer (4).
ie.browser
<browsers>
 <browser id="IE" parentID="Mozilla">
  <identification>
   <userAgent match="MSIE (?'version'(?'major'\d+)(\.(?'minor'\d+)?)(?'letters'\w*))(?'extra'[^)]*)" />
   <userAgent nonMatch="IEMobile" />
  </identification>
  ..
By referring to its id (2), it is possible to use the identification and attach adapters to the proper browsers.
AdapterMappings.browser
<browsers>
 <browser refID="IE">
  <controlAdapters>
   <adapter .. />
  </controlAdapters>
 </browser>
</browsers>
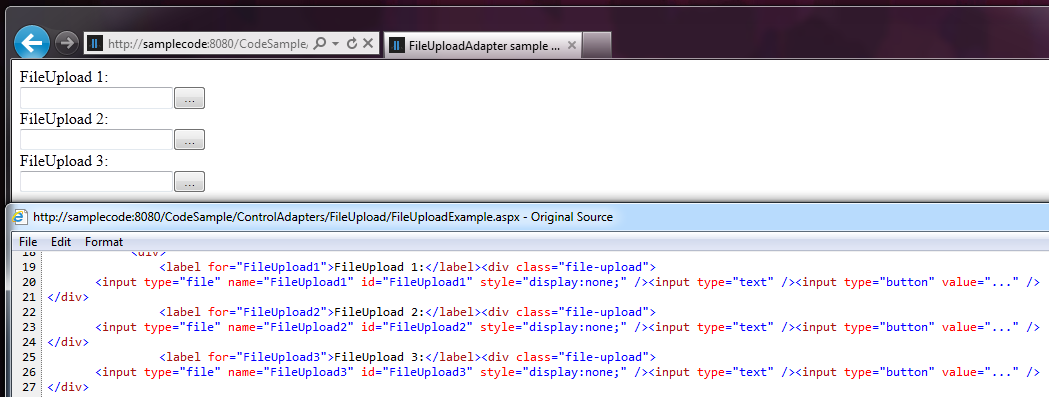
If this was applied to the FileUpload styling control adapter from the earlier post, the result of viewing it in Internet Explorer 9 would be the following.
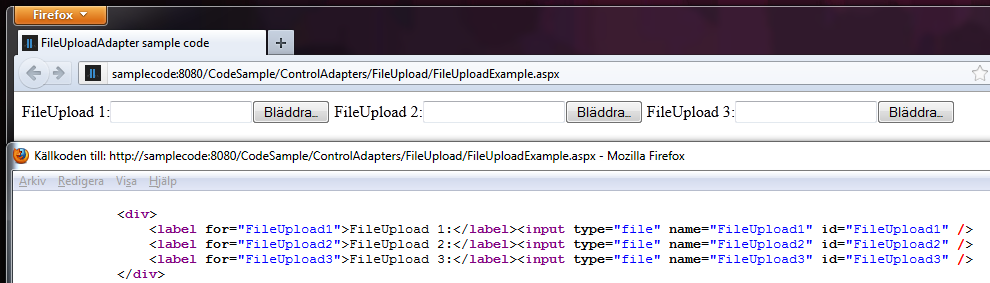
Whereas surfing to the same page using good old FireFox would give us nothing but the standard behaviour of the control.
In addition to mapping control adapters, browser recognition files are used to populate the earlier mentioned HttpBrowserCapabilities class allowing for browser information to be accessible through the Request.Browser property.
It is not recommended to make changes to the browser files in the %SystemRoot%\Microsoft.NET\Framework\v4.0.30319\Config\Browsers\ directory, as these may be updated in new service packs; thus overwriting your modifications. More information and examples on how to configure your definition files available at msdn.