When working with large EPiServer websites having hundreds of tousands of visitors each month, you will want to make sure that you get as little downtime as possible while deploying your new releases; especially if the website’s content is of a nature that downtime may cause unnecessary damage, financial or otherwise, to the visitors. As these large websites are likely to run in load balanced multi server environments with master and slave EPiServer licenses, doing things wrong will cause license violation exceptions bringing your webfronts down, or even having remote events clearing your server caches. (Step-by-step checklist below).
Credits goes both to my collegues at Valtech, Joakim Molin and Christer Bermar, as well as Basefarm‘s Jens Engfors, and to Fredrik Haglund for explaining this. Thank you for being awesome, Fredrik!
Why the license exception “This slave site has no master license information” is thrown while redirecting to a temporary EPiServer database
A possible step in a deployment procedure may be to redirect all of your visitors to use a temporary copy of the EPiServer database while you do your upgrade work on the original one, as well as selected webfronts. Because of the way that EPiServer handles its master and slave licenses, picking the wrong webserver for this may cause an exception saying “This slave site has no master license information” to be thrown. If you receive this error, it is likely that the webserver that you were trying to redirect to another database was not the one with the master license file. To see why this is important it is necessary to understand a bit more about the licenses.
When you are using a master license file on a server, EPiServer will generate a cryptographic license ticket based on various parameters and add it to the EPiServer database. The slave servers will then use this database entry to verify their validity; should the slaves fail to find the matching master license information in the database, an EPiServerException with said message will be thrown. Note that the license exception may also occure if the master server has been down for an extended period of time; there is a short grace period however.
When generating these ticket values, EPiServer partly uses its database connectionString. So, when updating a slave server’s connectionString to point to a temporary database, what you are also doing is changing the expected ticket value to one that will obviously not exist in the temporary database. Hence, the exception will be thrown.
To avoid this exception, make sure that you change the connectionString of the master server first. This will cause a new entry to be written into the temporary database, and slaves with the same temporary connectionString will thereafter work. The other slaves with the original license information will keep function as well for a short period of time since the old entry is still in the original database, which they are pointed to; thus allowing you to perform your release.
Preventing the EPiServer master server from emptying cache on the slave webfronts using remote events
Inconsistency caused by copying the EPiServer database in the manner described in the below section may in turn cause the EPiServer master server to send remote events clearing the cache on the slaves. Since our goal is deploying our code without the visitors noticing, this is not acceptable. One way to solve this is by setting up a temporary firewall rule blocking UDP traffic over port 5000 (configuration example below) for the duration of the release, another is to make a few changes to the master server’s web.config file.
Master server web.config
<?xml version="1.0" encoding="utf-8"?>
<configuration>
 <system.serviceModel>
  <client>
   <endpoint name="RemoteEventServiceClientEndPoint"
    address="soap.udp://239.255.255.19:5000/RemoteEventService"
    binding="customBinding"
    bindingConfiguration="RemoteEventsBinding"
    contract="EPiServer.Events.ServiceModel.IEventReplication" />
  </client>
  <services>
   <service name="EPiServer.Events.Remote.EventReplication">
    <endpoint name="RemoteEventServiceEndPoint"
     contract="EPiServer.Events.ServiceModel.IEventReplication"
     binding="customBinding"
     bindingConfiguration="RemoteEventsBinding"
     address="soap.udp://239.255.255.19:5000/RemoteEventService" />
   </service>
  </services>
Comment out the two endpoints RemoteEventServiceClientEndPoint and RemoteEventServiceEndPoint, they will be readded when you deploy the new release to the master server overwriting it’s configuration files.
Long start-up times for EPiServer and restarting web fronts making all servers clear cache
If you are using PageTypeBuilder for your EPiServer website there is one very important thing that you should be aware of. Omitting this may cause unnecessary start-up times for your site should you have a large number of page types, as well as making restarting web fronts in a multi server environment having all other servers clearing their cache.
In the pageTypeBuilder configSection of your web.config file you will find an attribute called disablePageTypeUpdation.
web.config
  <pageTypeBuilder disablePageTypeUpdation="true" />
</configuration>
In short, having this set to false will cause PageTypeBuilder to save all of your EPiServer page types each time a web front is restarting. This is exactly what you want when you for instance have added new page types, but it is not necessary when there are no new changes to be made. When the page types are updated, a clear cache remote event will be triggered and propagated to the other web fronts; resulting in them dropping their cache. When you are deploying, this is likely not an issue if you turn off the events as described previously, but for production servers under heavy load with remote events turned on it may be a disaster.
Thanks to Mattias Lövström at EPiServer for pointing this out.
Step-by-step procedure for deploying an EPiServer website with master slave licenses in a load balanced multi server environment without visitor downtime
This step-by-step procedure may be used to deploy an EPiServer website in a load balanced environment without causing unnecessary downtime for the website’s visitors. Each step will explain what needs to be done, and why. Needless to say, always back up your database, site and so on before getting started; after that point web editors ought not to be working until you’re done, as any changes they make will be lost should you need to rollback the release.
The EPi-DB mentioned below symbolises both the EPiServer content databse as well as any other custom databases that you may have in your environment set-up.
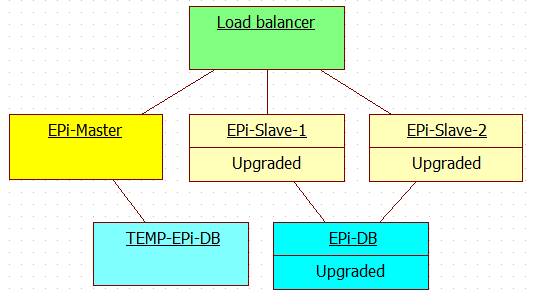
1 – Initial load balanced environment set up
First, let us start of with some environment information. The image below shows a three server set up in its initial state; before we upgrade it to a new release of our website.
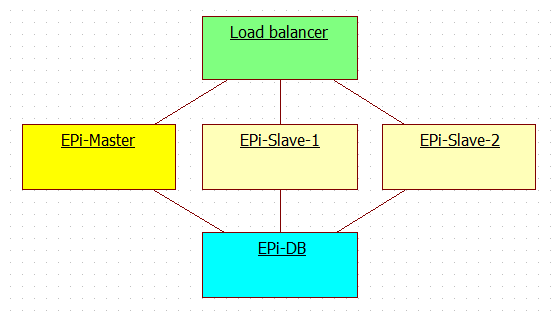
- EPiServer license: All three servers running with EPiServer master or slave licenses.
- Load balancer: Distributing requests between servers.
- EPi-Master: EPiServer master installation (front for visitors).
- EPi-Slave-1: First EPiServer slave installation (front for visitors).
- EPi-Slave-2: Second EPiServer slave installation (front for visitors *).
- EPi-DB: EPiServer database shared by all three web fronts.
* It is of course also possible to have a dedicated machine for EPiServer web editors in this set up, in my current project that would be the second slave server.
Note: It is important that you have the disablePageTypeUpdation attribute set to true in your production deployment package for reasons described previously.
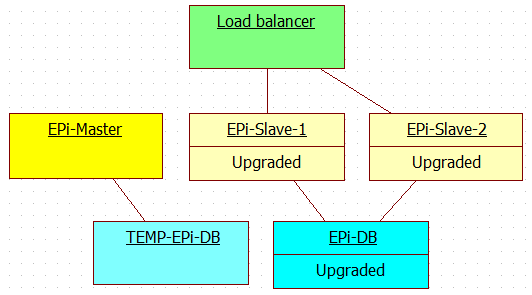
2 – Create temporary EPiServer database and remove master server from load balancer
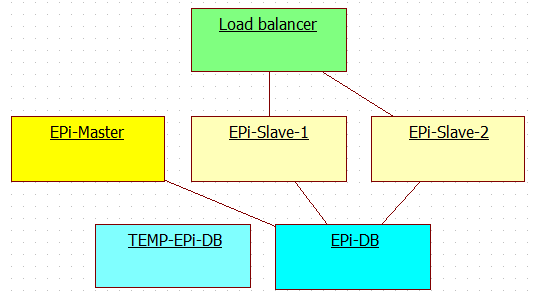
- TEMP-EPi-DB: Create a temporary EPiServer database to handle requests while you upgrade the real one.
- Load balancer: Remove EPi-Master from the load balancer and allow all requests to be handled by the two slaves.
A simple back-up/restore through SQL Server Management Studio will do to create the temporary EPiServer database. It is a lot less pain however to create a simple PowerShell script doing this procedure for you; a lot less error prone as well.
Removing the EPi-Master web front from the load balancer will allow you to tinker with the configuration files without bothering any of the visitors. Why we are starting with the master server is explained in a previous section of this article.
3 – Disable EPiServer’s RemoteEventService and let the master server use the temporary EPiServer database
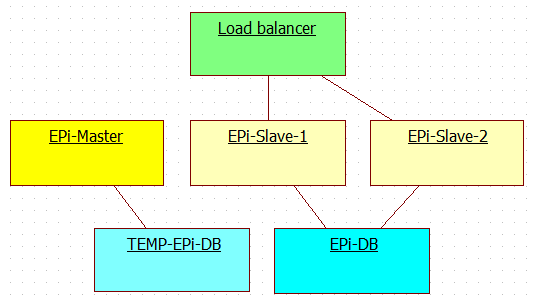
- EPi-Master: Update the EPi-Master connectionString and make it use the temporary EPiServer database.
- EPi-Master: Comment out the endpoints RemoteEventServiceClientEndPoint and RemoteEventServiceClientEndPoint in the master server web.config.
As the master server is the only one that we should be updating the connectionString on at this point, this is the one that will need to be directed to use our temporary EPiServer database. As soon as a new cryptographic value has been added to the database (see previous section), we should be able to redirect slave servers to the temporary database as well, should the need arise.
As explained in a previous section you may also for instance set up a firewall rule blocking traffic instead of disabling the two endpoints in web.config. Should you go with the latter though, they will be readded automatically when you deploy your new release thus overwriting the configuration files.
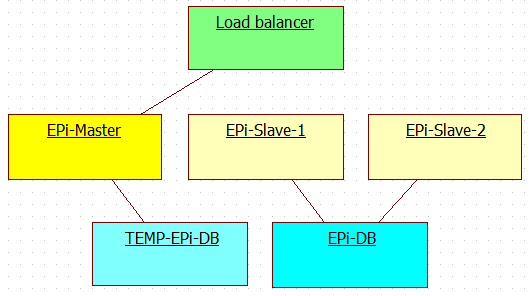
4 – Warm-up the master server and re-add it to the load balancer

- Load balancer: Re-add EPi-Master to the load balancer to start letting visitors use it instead of the slave servers.
As mentioned earlier, no one should be writing things to the database* at this point, so it is safe to start using the temporary EPiServer database which will be discarded at the end of the deployment procedure.
* EPiServer XForm data might of course be written should we be so unlucky as to have visitors submit forms while the temporary database is online. If you are using XForms on your website and think that this will be an issue, you may have to take steps towards preventing this from happening.
5 – Remove the slave servers from the load balancer
- Load balancer: Remove EPi-Slave-1 and EPi-Slave-2 from the load balancer causing all traffic to go to EPi-Master.
At this point we will drain the two slave machines of all their visitors and have them use the master server (and whatever other servers you may have using the temporary database) instead. As soon as all the requests are safetly out of the way we may proceed with the next step.
6 – Upgrading the slaves and the original database with the new release, warming them up and re-adding them to the load balancer
A rather large step, but no point in breaking it down any further.
- Both slaves: First, stop the application pools and sites in the IIS.
-
EPi-Slave-1: Second, deploy the new code to the first slave server.
- This is where you set the PageTypeBuilder attribute disablePageTypeUpdation to false if you have made page type changes.
- EPi-DB: Third, update the original database with whatever changes you may need.
-
EPi-Slave-1: Fourth, start the application pool and site in the IIS, and make a web request to it.
- If you changed the PageTypeBuilder attribute disablePageTypeUpdation to false before doing this, your changes will now be written to the EPiServer database.
- Remeber to set the attribute back to true as soon as this updation is complete.
- EPi-Slave-2: Fifth, deploy the new code to the second slave server.
- EPi-Slave-2: Sixth, start the application pool and site in the IIS, and warm your servers up.
- Load balancer: After you are done upgrading the slaves and the original EPiServer database, re-add them to the load balancer as in the image above.
Both the deployment of the new code as well as the database upgrading may be done manually, but it is much less tedious to have these parts scripted. In my current project we use PowerShell scripts for releasing new code together with Tarantino for database updates.
7 – Remove the master server from the load balancer
- Load balancer: Remove EPi-Master from the load balancer.
All visitors should now be redirected to use the two slaves and the original EPiServer database which have all been upgraded with the latest changes. As soon as the master server is drained of all its visitors, proceed with the next step.
8 – Upgrade the master server, warm it up and re-add it to the load balancer

- EPi-Master: First, stop the application pool and site in the IIS.
- EPi-Master: Second, deploy the new code to the master server. *
- EPi-Master: Third, start the application pool and site in the IIS, and warm it up.
- Load balancer: When you are done, re-add the master server to the load balancer.
- TEMP-EPi-DB: Remove the temporary EPiServer database as it is no longer needed.
* When you deploy the new code to the master server you will likely overwrite the configuration files in the web root with new ones, thus replacing the temporary connectionString with the original one; hence, your master server will automatically be redirected to use the original database as soon as it is successfully upgraded with the new release. The temporary EPiServer database with its extra cryptographic key is no longer needed and can be discarded at this point. If you commented out or removed the two enpoints from the master server web.config, this is where they will be readded as well.
Note: The