Constructing custom properties for EPiServer often gets you to a point where you would much rather just use built-in EPiServer functionality instead of reinventing wheels; especially when it comes to things such as adding page selectors, XForms selectors, or just for picking things like files or images from the EPiServer VPPs. I have assembled some notes on a few of the ways of how to pop up those windows and getting hold of the selected values. All of the sample code from this post is available at GitHub.
How to open an EPiServer page selector popup retrieving a PageReference
If you are able to use a server control for this, it is very simple. All you have to do is make sure that you can access the EPiServer WebControls (line 2 or 6 below), and then create an InputPageReference (14). See the sample code in PageSelectorPopup.aspx at GitHub.
Possible configurations for registering the EPiServer assembly
<%@ Register TagPrefix="EPiServer" Assembly="EpiServer" Namespace="EPiServer.Web.WebControls" %>
<?xml version="1.0" encoding="utf-8"?>
<configuration>
 <system.web>
  <pages>
   <controls>
    <add tagPrefix="EPiServer" namespace="EPiServer.Web.WebControls" assembly="EPiServer" />
Creating the InputPageReference
<div style="margin: 10px;">
  Select a page: <EPiServer:InputPageReference ID="DemoReference" runat="server" />
</div>
If everything is set up correctly this will render the familiar Edit Mode page selector control on your page, which when clicked pops up the page selector window.
Doing this manually without involving server side EPiServer controls is still not difficult, although it requires a little bit more understanding on how the control works. Apart from the obvious <input type=”text” /> and <input type=”button” /> tags there is a third input field which is hidden. This is where the actual value (page id) is stored. So, mimicing EPiServer’s own way of rendering the InputPageReference control will leave us with a bit more code on our part, but yields the same result.
Manually adding an EPiServer page selector without server side controls
<div style="margin: 10px;">
 <label for="page-selector_Display">Select a page:</label>
 <input type="hidden" id="page-selector_Value" name="page-selector_Value" />
 <input type="text" id="page-selector_Display" name="page-selector_Display" class="episize240" disabled="disabled" />

 <input id="page-selector-button" name="page-selector-button" class="epismallbutton" type="button" onclick="EPi.CreatePageBrowserDialog('/secure/ui/CMS/edit/pagebrowser.aspx',document.getElementById('page-selector_Value').value,'False','False','page-selector_Display','page-selector_Value','en', null, null, false);" value="..." />
</div>
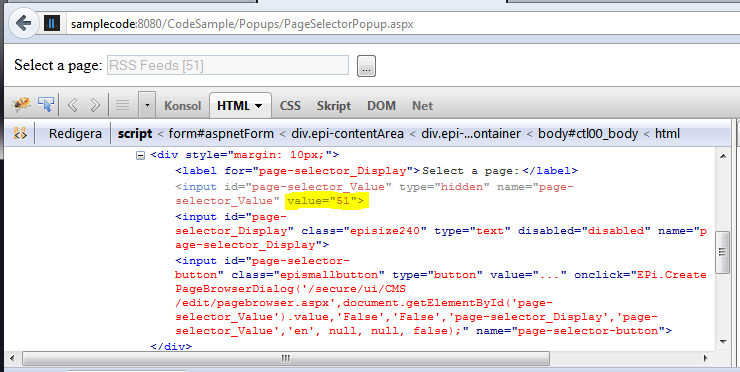
The page-selector_Display (8) and page-selector_Value (7) fields are where EPiServer’s JavaScript will store the user’s selected page information; for instance RSS Feeds [51] and 51 respectively. The interesting part in this code however, is found in the button’s onclick attribute. Most of it can be rather intuitively understood, although there are a few parameters which may need some clarification. Let’s have a look at the function in EPiServer’s source code (I believe the default installation path for this file will be something in the lines of C:\Program Files (x86)\EPiServer\CMS\6.1.379.0\Application\UI\CMS\Javascript\system.js).
\Javascript\system.js
EPi.CreatePageBrowserDialog = function(url, id, disableCurrentPageOption, displayWarning, info, value, language, callbackMethod, callbackArguments) { .. }
The first and second parameters are obviously where you put the URL to EPiServer’s page browser template as well as the page id of the currently selected page (which in our case is stored in the hidden page-selector_Value field above). The third and fourth (disableCurrentPageOption and displayWarning) parameters take two rather self explaining booleans, and the same goes for number seven (language) which tells the pop-up window what language you want the page tree view to appear in; en for English, sv for Swedish, and so on. The info and value parameters are the ids of the fields holding this information (_Display and _Value above) and lastly you can insert a callback function and arguments if you would like to do something more advanced with your time.
var completeUrl = url + '?id=' + id + '&disablecurrentpageoption=' + disableCurrentPageOption +'&info=' + info + '&value=' + value + '&epslanguage=' + language + '&displaywarning=' + displayWarning;
var dialogArguments = window.document;
var features = { width: 440, height: 550, scrollbars: "no"};
return EPi.CreateDialog(completeUrl, callbackMethod, callbackArguments, dialogArguments, features);
When looking at what EPiServer does with the information that we have just provided, we see that it is mashing most of it together with our target URL, followed by setting default window size and creating a new dialog using the EPi.CreateDialog function (we will use this in more detail further down the post).
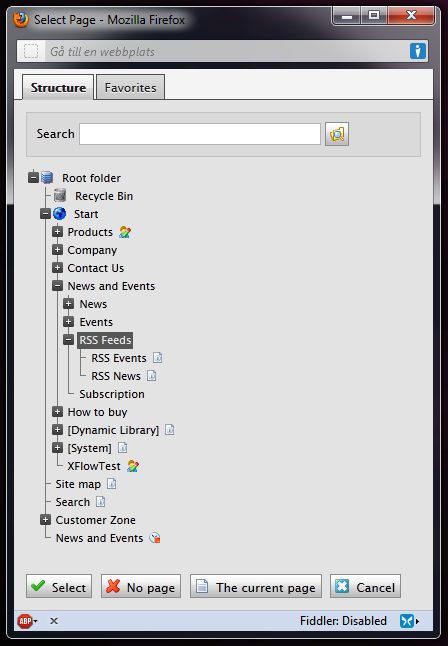
Surfing to our page in FireFox, we will find a working EPiServer page browser control as in the picture above.
How to open an EPiServer image selector popup or file browser accessing the VPP
An easy way of doing this which does not require the use of server side controls, is by adding a text field and a button tying it all together with a few pieces of script. See the complete sample code in FileSelectorPopup.aspx at GitHub.
Let us start by creating the needed HTML.
Manually adding an EPiServer file browser or image selector
<label for="image-selector">Select a file:</label>
<input id="image-selector" class="episize240" type="text" maxlength="255" name="image-selector" />
<input id="image-selector-button" class="epismallbutton" type="button" value="..." name="image-selector-button" />
When this is done, the first thing we need is a function spawning the dialog window (12-19). Have it take a selected file path as well as a callback function as its arguments. There is really no rocket science in this one, all it does is assembling a few arguments for customizing the popup window (14-16) and creating the actual dialog (18).
function epiFileManagerDialog(selectedFile, onCloseCallbackFunction) {
 var onCompleteArguments = new Object();
 var dialogArguments = new Object();
 dialogArguments.hideBookmarks = true;
 dialogArguments.parentWindow = document.window;
 var fileManagerBrowserUrl = EPi.ResolveUrlFromUI("edit/FileManagerBrowser.aspx") + "?selectedfile=" + selectedFile;
 EPi.CreateDialog(fileManagerBrowserUrl, onCloseCallbackFunction, onCompleteArguments, dialogArguments, { width: 660, height: 460, scrollbars: "no" });
};
As you can see we are using the EPi.CreateDialog(..) function directly here as opposed to opening the page selector earlier in the post. This function also resides in the system.js script file and initializes a new EPi.Dialog creating the window.
\Javascript\system.js
EPi.CreateDialog = function(url, callbackMethod, callbackArguments, dialogArguments, features, opener) {..}
There are both optional as well as required values; the URL to the file which should be opened in the dialog is of course of the latter, while the callbackMethod is not, and so on. So, getting back to our code, it would be lovely if we had a callback function handling the user’s selections. Create a function acting on a click event as well as our <input type=text .. /> value container (20-33).
function selectFile(evt, urlInputField) {
  epiFileManagerDialog(urlInputField.val(), function (a, b) {
    if (a.closeAction == 'insert') {
      var selectedFilePath = a.items[0].path;
      urlInputField.val(selectedFilePath);
      EPi.PageLeaveCheck.SetPageChanged(true);
    } else if (a.closeAction == 'clear') {
      $("#image-selector").val('');
      EPi.PageLeaveCheck.SetPageChanged(true);
    } else if (a.closeAction == 'cancel') {
      // ..
    }
  });
};
This function uses the previous function to open the EPiServer file browser window with the selected file using a callback function. Returned to us when the user either Saves, Clears or Cancels the selection is a closeAction value. This may be either insert (22), clear (26) or cancel (29) as seen above. It is doubtful that you would need to do anything for the cancel action, but it is added for demonstrational purposes. Based on the action, either update the value containing input text field, clear it or do nothing at all. If you look at lines 25 and 28, you will find a line of code telling EPiServer’s built-in leave check that the user has made a change to the page, and should be notified with a pop-up if they try to leave the page without saving their work.
function initialize() {
  var urlInputField = $("#image-selector");
  $("#image-selector-button").click(function (evt) { selectFile(evt, urlInputField); });
}
$(document).ready(initialize);
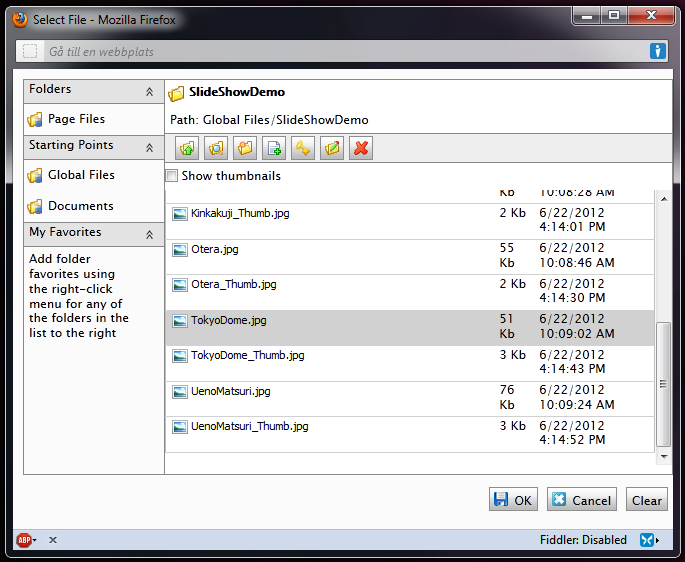
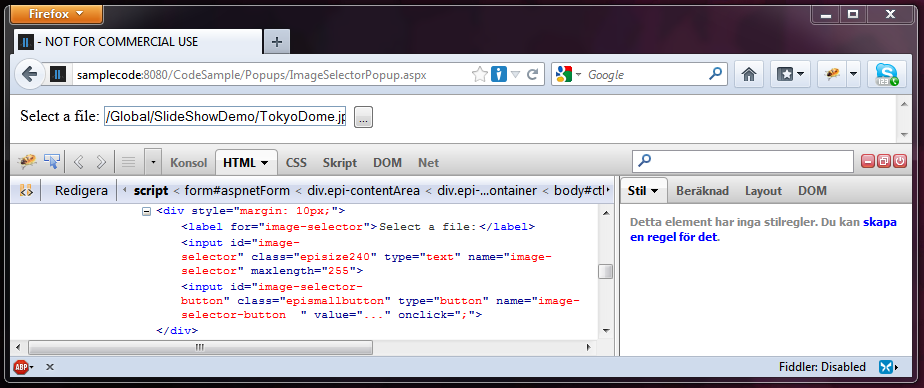
Tip everything off by binding a click event to the button to actually make it do something. The rendered control in the sample page looks like this when there is an image selected.
How to open the EPiServer XForm browser pop-up window
If you are unable to use server side EPiServer controls for selecting XForms, it is possible to copy the behaviour of EPiServer’s XForm selector. The method of doing this is rather similar to the one for opening the EPiServer’s file manager in the section above, with the key difference that this one is almost solely based on EPiServer’s own JavaScripts. See the complete sample code in XFormSelectorPopup.aspx at GitHub.
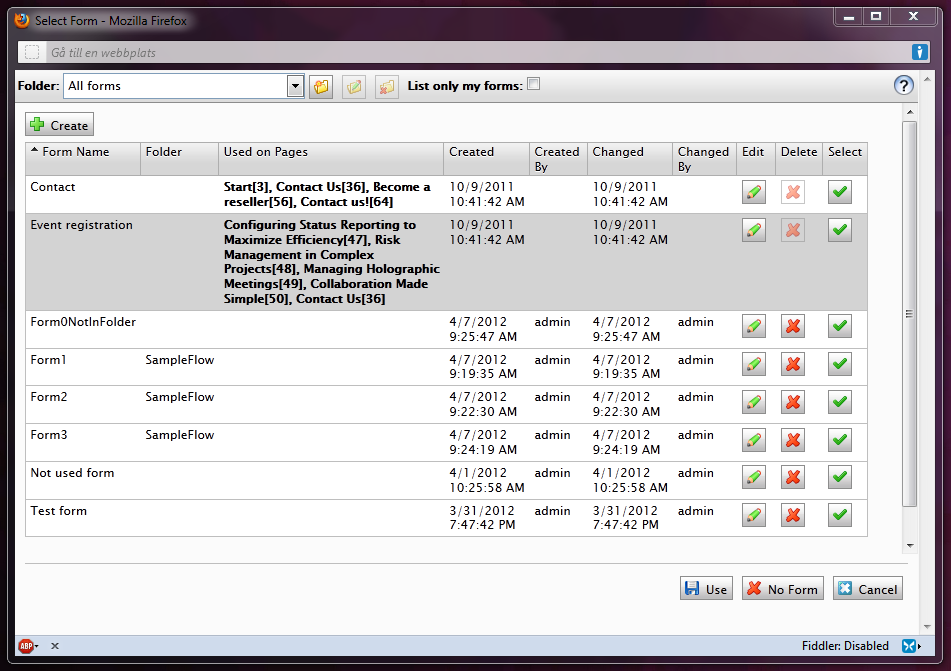
(Don’t mind all the bogus XForms in the pop-up picture, they are just test data from a Wizard-type XForm flow-property that I’ve been working on.)
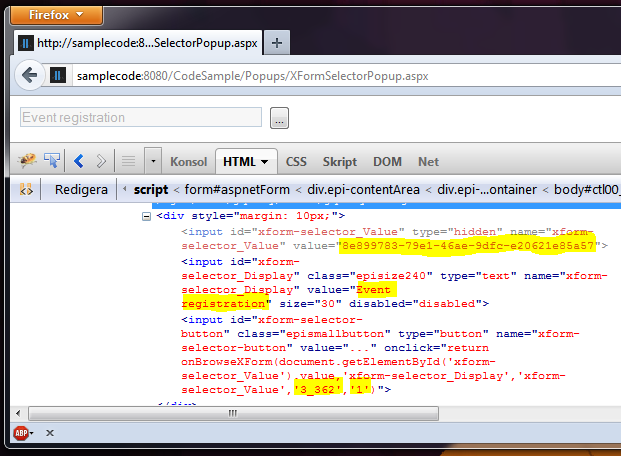
Manually adding an EPiServer XForm selector
<div style="margin: 10px;">
 <input id="xform-selector_Value" type="hidden" value="d883ef9b-88de-43e2-83ed-dd3d08e50215" name="xform-selector_Value">
 <input id="xform-selector_Display" class="episize240" type="text" disabled="disabled" size="30" value="Contact" name="xform-selector_Display">
 <input id="xform-selector-button" class="epismallbutton" type="button" onclick="return onBrowseXForm(document.getElementById('xform-selector_Value').value,'xform-selector_Display','xform-selector_Value','3_362','1')" value="..." name="xform-selector-button">
</div>
The HTML used here is very similar to the one used in the previous section. There is a hidden input field xform-selector_Value (5), a user feedback text field xform-selector_Display (6) as well as the mandatory button (7). This time the _Value field is holding Guid value unique to the selected XForm, while the _Display box simply holds the XForm’s name. You will probably want to generate something here from wherever you store your values, together with two of the parameters for the function being called from the onclick attribute; the pageId and the parentId (3_362 and 1 in the code snippet above.)
Next, let’s nick the onBrowseXFrom function and a callback function from EPiServer’s EditPanel.aspx page template using FireBug. I removed a few comments to make this more readable; check the code sample at GitHub, or better yet, EPiServer’s own files for the complete version.
function onBrowseXForm(id, s1, s2, pageId, parentId) {
 var dialogWidth = 920;
 var dialogHeight = 565;
 var baseUrl = EPi.ResolveUrlFromUI("edit/XFormSelect.aspx");
 EPi.CreateDialog(baseUrl + '?form=' + id + '&pageId=' + pageId + '&parentId=' + parentId, OnXFormBrowseCompleted, { s1: s1, s2: s2 }, null, { width: dialogWidth, height: dialogHeight });
 return false;
}
The onBrowseXForm function parameters (12) are rather straight forward. First the currently selected XForm id Guid value, next the id of the field holding the user feedback value (the _Display field supposed to hold the XForm name) and the id of the _Value field where the selected guid should be stored. All followed by the id of the page where the XForm is added and the id of it’s parent. I added a EPi.ResolveUrlFromUI call (15) to make the code I stole more flexible.
function OnXFormBrowseCompleted(objectReturned, onCompleteArguments) {
 if (!objectReturned && objectReturned != '') {
   return;
 }
 var s1 = document.getElementById(onCompleteArguments.s1);
 var s2 = document.getElementById(onCompleteArguments.s2);
 if (!s1 || !s2) {
   alert('Xform selection failed');
   return;
 }
 EPi.PageLeaveCheck.SetPageChanged(true);
 if (objectReturned.id) {
   s1.value = objectReturned.name;
   s2.value = objectReturned.id;
 }
 else {
   s1.value = '';
   s2.value = '';
 }
}
The XForm callback function sets the appropriate values to the fields with our supplied ids if an XForm was selected or the value should be cleared. Also notice the built-in page leave check being set to true here (30).
The code from this sample yields the above output.
How to open the EPiServer Date browser selecting a DateTime value
Again, if you are unable to just add a server side EPiServer control InputDate to your custom property for some reason, it is possible to add the functionality manually with a bit of scripting. This is probably the easiest one so far in this post, as it takes very little effort on our part. See the complete sample code in DateSelectorPopup.aspx at GitHub.
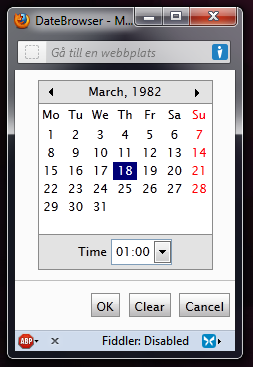
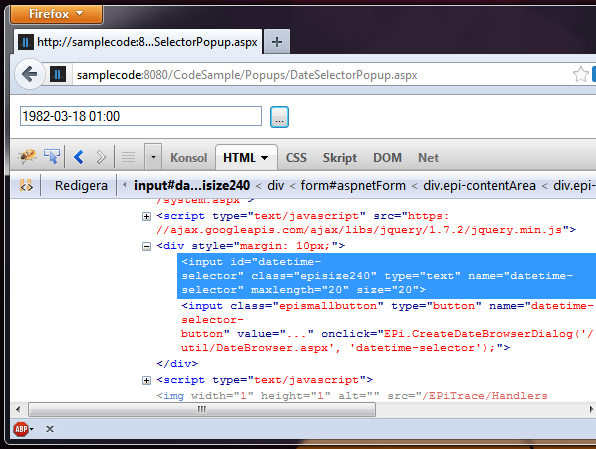
Manually adding an EPiServer InputDate DateTime selector without server side controls
<div style="margin: 10px;">
 <input id="datetime-selector" class="episize240" type="text" size="20" maxlength="20" name="datetime-selector">
 <input class="epismallbutton" type="button" onclick="EPi.CreateDateBrowserDialog('/util/DateBrowser.aspx', 'datetime-selector');" value="..." name="datetime-selector-button">
</div>
What we see in the interface is what we need to add to our source code, almost. The button’s onclick event triggers a dialog creation function with two parameters; the URL to the page to be opened, as well as the id of the field holding the DateTime value. If you remember EPiServer’s JavaScript file system.js from earlier, this is where we will find the EPi.CreateDateBrowserDialog function as well.
\Javascript\system.js
EPi.CreateDateBrowserDialog = function(url, id, callbackMethod) {
As you see above, the function also accepts a callbackMethod should you wish to supply one. It is not mandatory however; if you omit it, EPiServer will simply use a default one writing the selected DateTime value to the input field with the id that you handed to it. If url is not set, the default DateBrowser.aspx will be used.
The code in the sample file at GitHub renders into the above web page.
How to open an EPiServer link URL selector pop-up window
With the EPiServer URL browser you may, as you know, select both URLs to external websites and internal EPiServer pages, as well as E-Mail addresses and fetching document or file URLs from either the VPPs (using the file manager), the network or other websites. To manually add a selector control popping up this browser window we need two input fields working together with a JavaScript function. See the complete sample code in UrlSelectorPopup.aspx at GitHub.

How to manually open an EPiServer URL selector pop-up window
<div style="margin: 10px;">
 <input id="url-selector" class="episize240" type="text" maxlength="255" value="/default.aspx?id=3" name="url-selector">
 <input class="epismallbutton" type="button" onclick="PropertyUrl_DoPickup('url-selector',130);" value="..." name="url-selector-button">
</div>
The PropertyUrl_DoPickup function which I borrowed from EPiServer’s EditPanel.aspx page template using FireBug requires the id of the input field where we want to store the value, together with a type identifier. The latter one is used to determine the browser selection mode, or what kind of url we are talking about; image, file, etc. I will not paste the whole JavaScript here, as it is rather long with quite a bit of nesting which would make things unreadable anyway with the page width that I am using, but check the code at GitHub or open EPiServer’s source to see it in whole. There are a few changes that I made to the script regarding the way the dialog URLs are retrieved; it now uses EPi.ResolveUrlFromUI to determine the correct paths.

The code in the sample at GitHub generates the above controls.
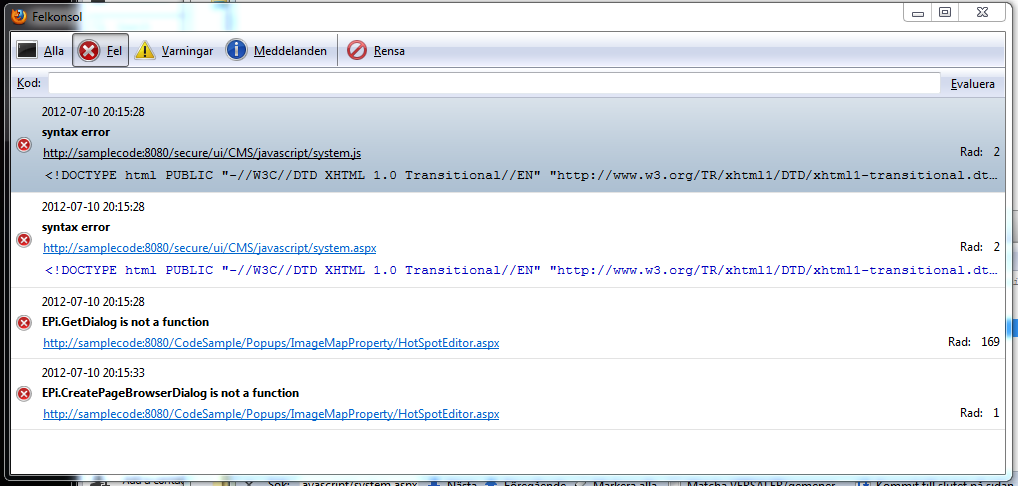
Syntax error – /javascript/system.js – EPi.GetDialog / EPi.CreatePageBrowserDialog is not a function
A silly troubleshooting pointer to make some of the headache go away. As it seems, things that you put under a virtual path having a <location .. > protected with <deny users=”*”>, only allowing certain administrative or editorial roles, will not be accessible unless you happen to be logged on as such (Doh..). So, if you try to access, say the EPiServer /javascript/system.js or /javascript/system.aspx, make sure that what you are getting is not the HTML for the default login screen.
2 responses to “How to open those EPiServer Edit Mode selector browser popups in your custom properties”
Hi Mathias,
I wanted to use the “Image Selector PopUp” in my custom property.
We are using usercontrol to display controls can you please guide how we can we use above mention PopUp in usercontrol.
Regards
Hi Rajesh!
I’ve written a piece of sample code (here) showing how it may be done and added it to GitHub for you. It is fairly straight forward, and you should be able to test it from the attached PopupFromUC.aspx file; might have to edit a few namespaces though.
The important thing is to make sure that you have the EPiServer JavaScripts available at the place where you want to use your user control; one way of doing it is using the EPiServer.UserControlBase.RegisterClientScriptFile method as in file ImageSelectorPopup.ascx.cs. RegisterClientScriptFile will make sure that your scripts are only added once. I’ve also moved most of the scripting to its own file (ImageSelector.js) to make things cleaner.
It might also be a good idea to use an unique identifier like the one in the sample to avoid collisions and duplicated code if you’re having multiple popups from the same user control.
I hope this helps, let me know if I can be of any further assistance :)
Cheers!
Mathias